How to create the survey?
You can start creating the survey by clicking on “Create from scratch” option. Add basic details of the survey like name, category, language, start and end date and click on “Continue”
You can find following 3 steps when you click on “Create survey”

- 1. Set up - Add basic details
- 2. Build
- Adding questions
- Applying logics
- Question settings
- Survey themes
- Preview
- Question types
- Logic types
- 3. Launch
- 4. Analyze
Get started: Creating a survey
Click on Create Survey the survey name, select the category, mention start and end date and click on continue. Get started with the set-up page and fill the required survey details and click continue.
Set Up
On set up page you can:
- Edit the survey name
- Category
- Select the country
- Update start and end date for the survey
- Set up assumed LOI (length of interview)
- Completes required for the survey.
- You can enable the Geo IP (Block a respondent to take survey from any other Geo location except the selected country)
- Allow multiple entries (Respondent can take the survey multiple time until he/she reach any of our end page.
Builder
How to build survey questions?
As soon as you continue to builder, you can see two options namely:
- Create from scratch
- Upload a questionnaire
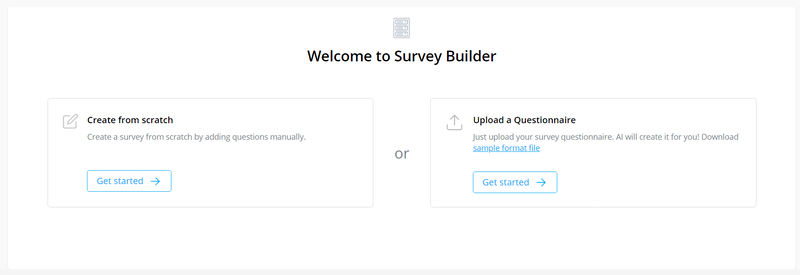
Create from scratch – By choosing this option you can start creating survey right away by adding your first type of question.
To keep adding more questions:
- Click on plus (+) icon on the left corner and select the type of question you want to create
- Enter the question text
- In the Answers fields, enter each answer choice.
- You can format questions and option texts
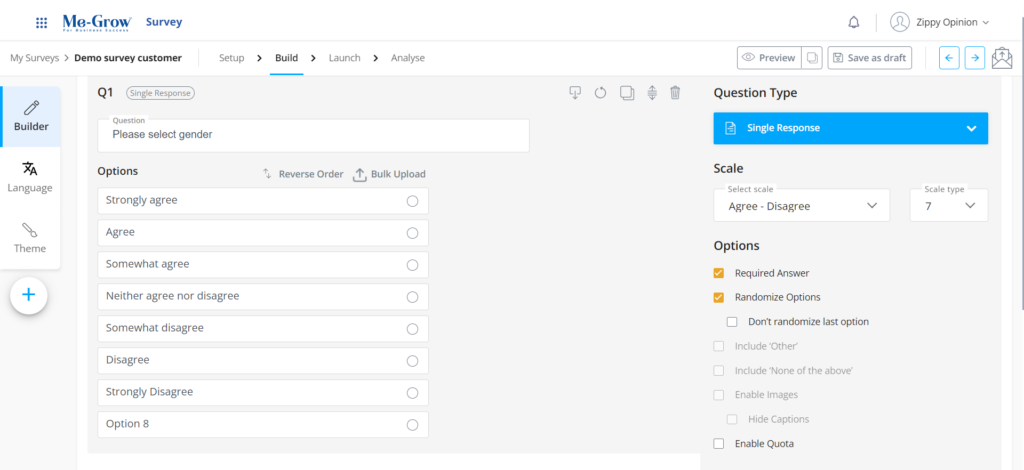
- Configure any additional options from the right panel in question editor mode (enable images, enable quota, randomize, required answer etc.)
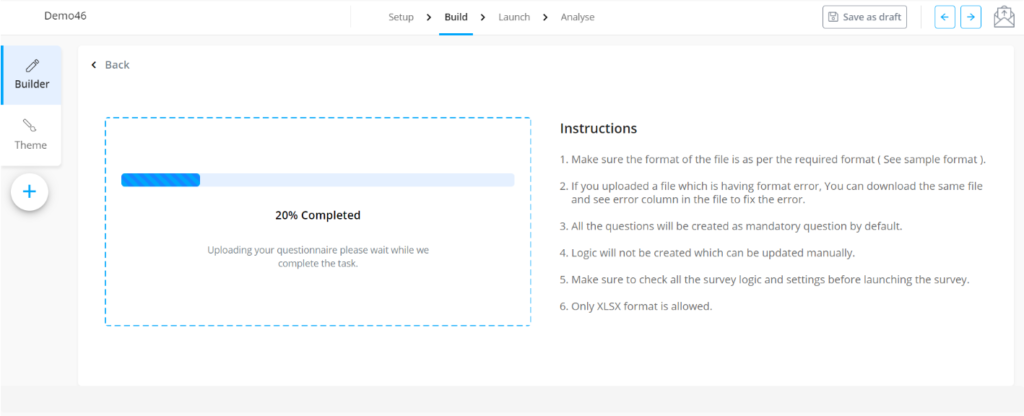
To Upload a Questionnaire:
- Click on Getting started with “Upload a questionnaire”
- Download our "Sample questionnaire format" to know how to create an AI formatted questionnaire.
- Once you are ready with your AI formatted questionnaire drag your file in upload area or simply click on “Upload” and select your questionnaire file from the computer
- If the file is not having any format error, you will see a success message and all the questions will be created automatically.
- Once the questions are created you can edit and update the questions or logics before moving to launch.
- If there are errors in the file AI will show you the error file and you can download the error file to rectify the file format errors.
- We always recommend you check all your questions and subsequent logics before moving to launch the survey.
Question Settings
Each question has additional settings you can configure in right hand side of the question type for Options, Logic, Copy and Custom error message.
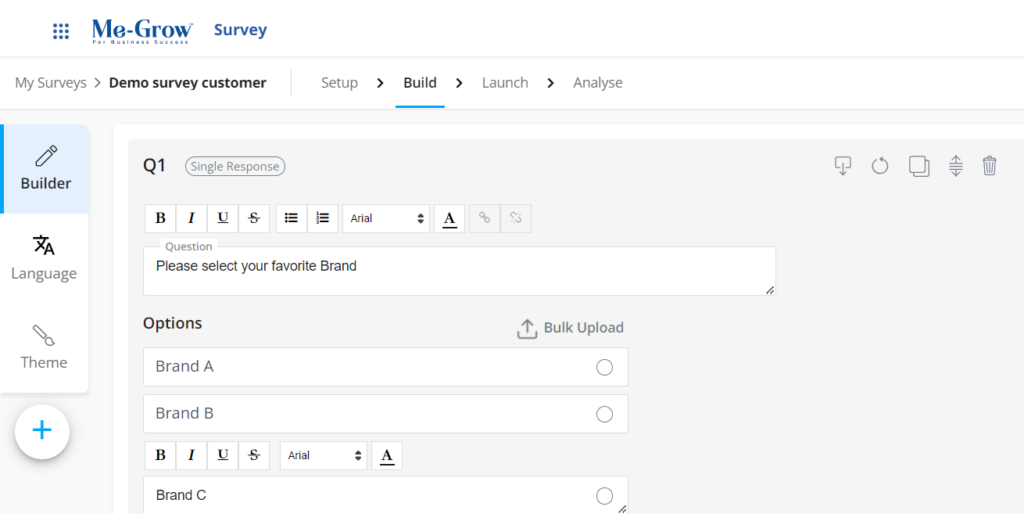
- Format Question & option texts - You can format your question & option text with given formatting options
- Question set up - Change your validation options and how your question is displayed. For example, you can choose “require an answer” which makes the question mandatory, randomize options, do not randomize last option, enable images, hide caption, enable quota, and include other and none of the above.
- Logic - You can add the logic to direct the respondent to a specific question based on their answer to the previous questions or could send them to terminate/complete pages. Basis on question type you can see relevant logics on right hand side.
-
Click on
 to save the question.
-
Click on
 to reset the question. In case you want revert the changes made to a question you can reset the question with this option.
-
Duplicate - Can duplicate the same question in the survey. If you have question set having a same identical option with different question text, you can choose to duplicate the question by clicking

-
Changing question sequence
 - Can change the question sequence after adding all the question by clicking and holding the icon to drag.
-
Delete
 - Can delete the question in the survey which is not required using this option.
Editing a saved question – You can edit your added questions any time when survey is in draft status. Editing existing questions is easy —just click on any question to go to edit mode of the question.
What are the question types I can create?
Following are the different types of question in builder tab which you can create.
- 1. Single response
- 2. Multiple response
- 3. Open end
- 4. Rating
- 5. Ranking
- 6. Section intro page
- 7. Dropdown
- 8. Matrix scale
- 9. Matrix rating
- 10. Date time
- 11. SEC (India)
- 12. NPS Score
- 13. Customer Info
- 14. Image comparision
Single response
Single response is a simple closed-ended question type that lets the respondents select only one answer from defined list of choices. For Example:
Q1. Please select the gender.
A. Male
B. Female
Multiple response
Multiple Choice is a simple closed-ended question type that lets respondents select more than one answer from a defined list of choices. For Example:
Q2. Please select the online shopping apps you are aware off?
A. Flipkart
B. Amazon
C. Paytm
Open End
Open end, allows a respondent to answer in open text format such that they can answer based on their complete knowledge, feeling and understanding briefly or with elaborated texts. For Examples:
Q3. Tell us about your experience with online shopping so far.
Enter your text here…
Rating
The rating question lets respondents evaluate a statement on a visual scale of stars and number. It has a rating limit for star 5 and number has 10. For example:
Star rating:
Q1. Please rate for the shopping experience with Amazon.
Number rating:
Q2. To what extent did you like the online shopping? Please rate it in a 10-point scale

Ranking
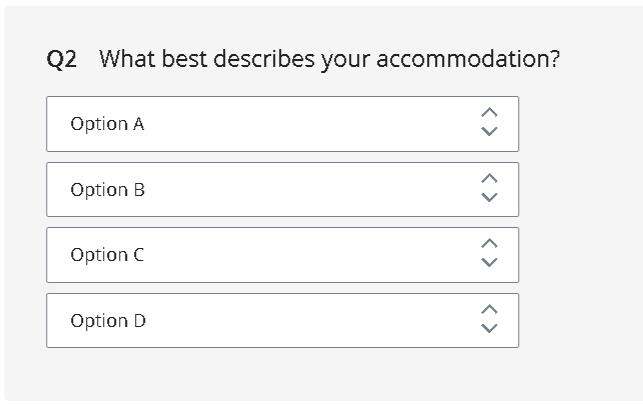
The Ranking question asks respondents to compare items to each other by placing them in order of preference. You can drag and drop the options for raking question.
Section intro page
Use this question to add Introduction to the survey or introduction to a section or add stimulus in the form of video/audio/images.
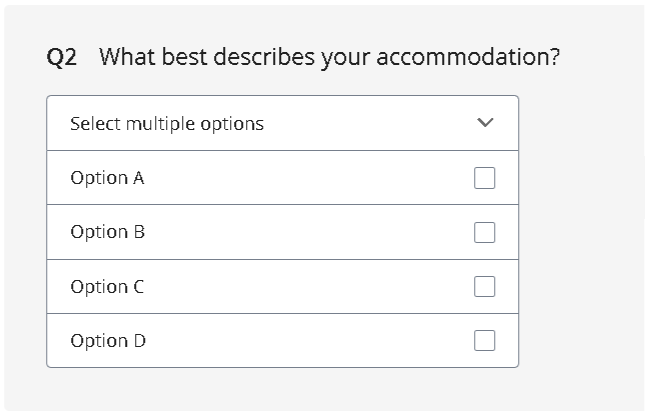
Dropdown
Dropdown is a closed-ended question that allows respondents to choose one answer choice from a list of choices presented in a dropdown menu. You can select single or multiple response from drop down. It has the star and number rating with the limit of 5 star and 10 for number rating.
Matrix scale
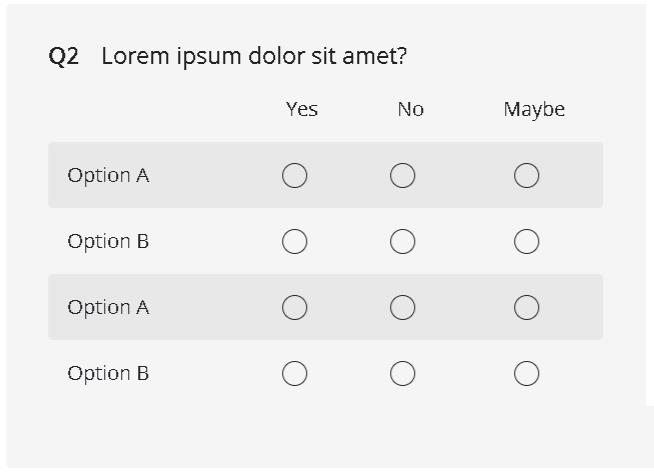
A Matrix scale question is a closed-ended question that asks respondents to evaluate one or more row items using the same set of column choices. You can select single or multiple response in the Grid and Drop-down format
Matrix rating
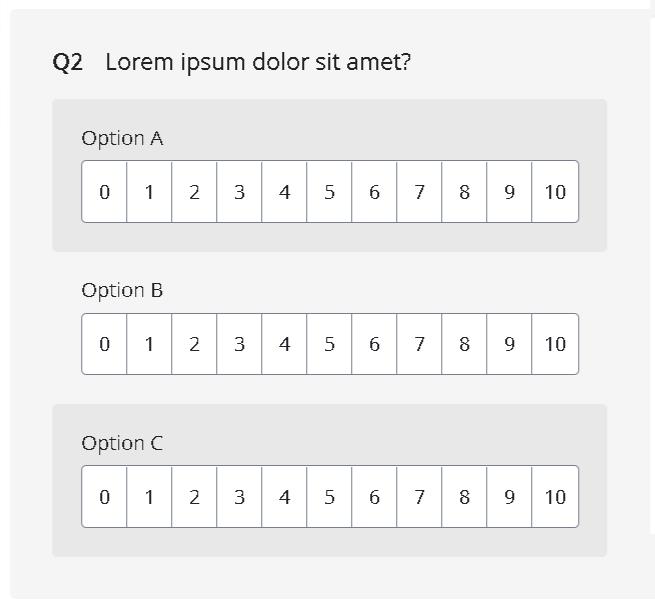
A Matrix rating Scale question, commonly known as a Likert Scale, is a variation of the Matrix question where you can assign weights to each answer choice. Rating Scales automatically calculate a weighted average for each answer choice in the Analyze Results section
Date time
The Date/Time question allows you to collect date and time information in a consistent format

SEC
SEC is a socioeconomic classification group urban Indian households on the basis of education and occupation of the chief wage earner (CWE: the person who contributes the most to the household expenses) of the household into five segments (SEC A, SEC B, SEC C, SEC D and SEC E households in that order). You can use this question type only for India.
NPS score
You can add NPS question to the survey. NPS score will help you to gauge customer loyalty by generating score basis the answers given by the respondents/customers. It is a rating scale question with a rating range of 0 to 10.
What are the types of logics available and how to apply those logics?
After creating the survey question, can apply the logic to the survey. Logic can help to get more relevant responses. For example: you can use question Ask if logic to control which questions survey takers will see next based on their answers to previous questions.
You can apply the logic from the right-side panel by choosing the right one for a question
Logics types
- 1. Terminate
- 2. Complete
- 3. Ask this question if
- 4. Skip this question if
- 5. If and/or
- 6. Pipe in option to question text
- 7. Pipe in option to this question form
- 8. Auto code
Terminate
It allows to target the specific respondents for the survey. For Example:
Q1. Please select the gender.
A. Male
B. Female (terminate if selected other option)
In the above case, if the survey requires only Male respondents, you can use the terminate logic to terminate female respondents
Complete
It will allow the specific group of respondents to complete the survey. For example:
Q2. Please select the shopping app you are aware of?
A. Shopping app 1
B. Shopping app 2
C. Shopping app 3 (complete if shopping app 3 is selected)
D. Shopping app 4
In the above case, if you wish to end the survey and keep them as completes for those who selected Option C you can apply this logic.
Ask this question if
Ask this question if logic lets the respondents to answer the specific question based on their answer to pervious closed ended question. For example:
Q1. Are you aware of the below mentioned advertisement or marketing communication?
A. New 1
B. Option 2
C. Attribute 3
D. Answer 4
E. Selection 5
Q2. Which among the following companies could “Attribute 3” belong to? (Ask if logic is applied from Q1 for option c (Attribute 3)
A. Com 1
B. Com 2
C. Com 3
D. Com 4
E. Com 5
Skip this question if
Skip Logic lets you skip a specific question for respondents based on their answer to a previous closed-ended question.
For example:
Q1. Please select your gender
A. Male
B. Female
Q2. Please select your favorite brand (Skip if selected option A in Q1)
A. Brand 1
B. Brand 2
C. Brand 3
If And/ Or logic
If and/or logic can be used when you want to ask a question basis on previous two questions response.
For Example:
Q1. Please select your age group
A. Less than 18 years
B. 18-24 years
C. 25-34 years
D. 35-44 years
E. 45+ Years
Q2. Are you married?
A. Yes
B. No
Q3. How you done insurance for you or your family member in the recent past? (Ask if Q1=C AND Q2 = A)
A. Yes
B. NO
Pipe in option to question text
You can use this logic to pipe in the answer of previous question to the question text of present question. To use this logic, you have to use the syntax {ans} anywhere in between the question text.
For example:
Q1. Which brand you are aware of?
A. Brand @
B. Brand #
C. Brand $
D. Brand %
Q2. You have mentioned that you are aware of {ans} (Pipe in the option selected in the previous question). Could you tell us more about it?
Pipe in option from
You can use this logic when you want to inherit the options from any previous multi response questions
For example:
Q1. Could you please tell us, which of the following apps/websites have you used for ordering food online? (Multiple question)
A. Food App @
B. Food App #
C. Food App $
D. Food App %
Q2. From the apps/websites which you just mentioned, which is your most preferred app/website? (Pipe in the selected option from Q1).
Auto code
You can use this logic with specific scenario where you don’t want respondents to answer repeated questions.
For example:
Q1. What is your highest level of education?
- Post Grad
- Grad
- High School
- Primary
Q2. Who is the chief wage earner in your family?
- Father
- Mother
- Spouse
- Self
- Other
Q3. What is the education of chief wage earner?
In this question you can apply, auto code logic as – If selected “Self” in Q2 auto code Q2 as per Q1” else ask Q2 for the rest.
How to Preview my draft survey?
Before launching, preview the survey to make sure everything working as expected. You will not be able to edit the questions, logic etc. once the survey is live so it’s helpful to uncover any issues in your survey design before launching.
To preview the survey design
- After adding the question types and logic to survey, click on save
- Click on preview at the top right corner
- Check a feature like required answer, randomize option or logics that you may have in your survey design are functioning properly
- You can also copy the preview link from the preview button to share
What are survey templates?
- To use a survey template,
- Go to survey templates page
- Filter by categories or search for a template
- Click on “Quick view” of a template
- Click on “Use template”


How to use survey QR codes?
You can generate multiple QR codes for surveys along with unique code numbers. You can track and maintain QR code surveys by branches for stores as well as for package QR code surveys
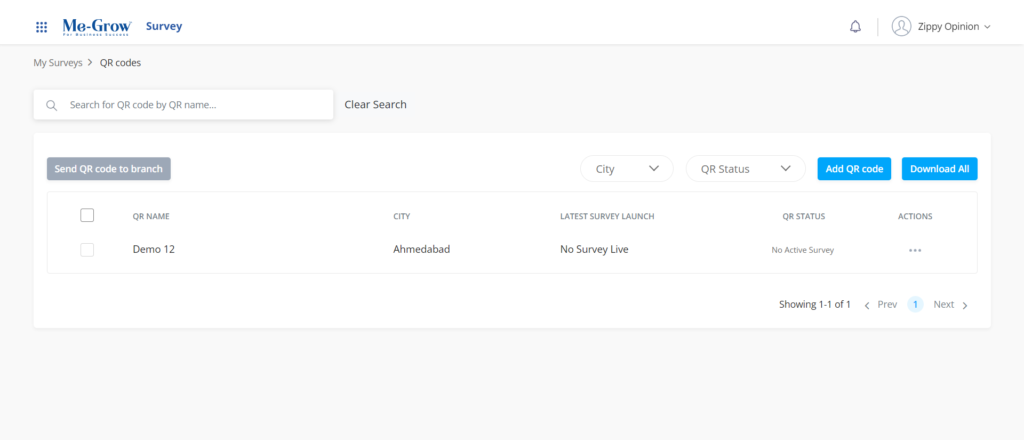
To add/generate QR codes:
- Click on “Add branch”
- Enter or upload the details
- Click on “Add branch”. Your QR codes will be generated.
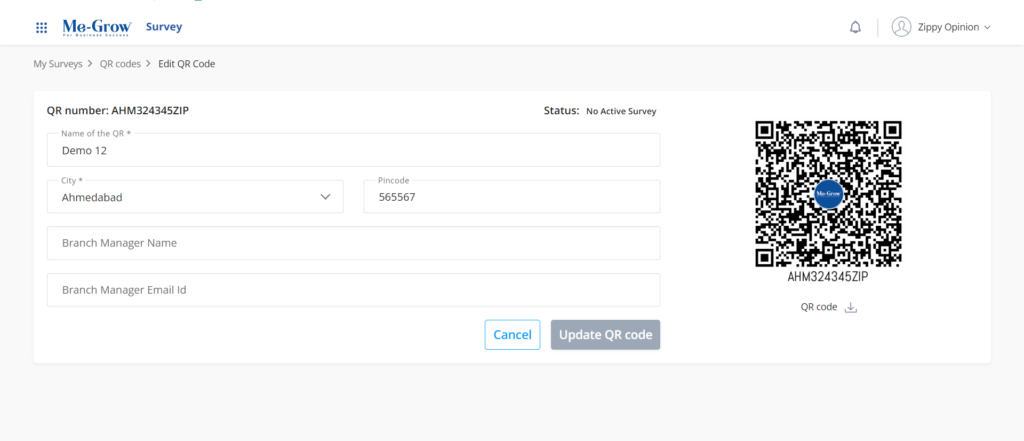
To edit or download details of the QR codes:
- Click on “Edit branch” for any QR code under action column
- Edit the details of the branch and click on Update
-
To download the QR code click on
 option given below the QR code
My Surveys
You can see all the surveys which are in draft, paused, active and closed status from this page. You can also see ready/predefined survey templates which can be used directly to create surveys quickly.
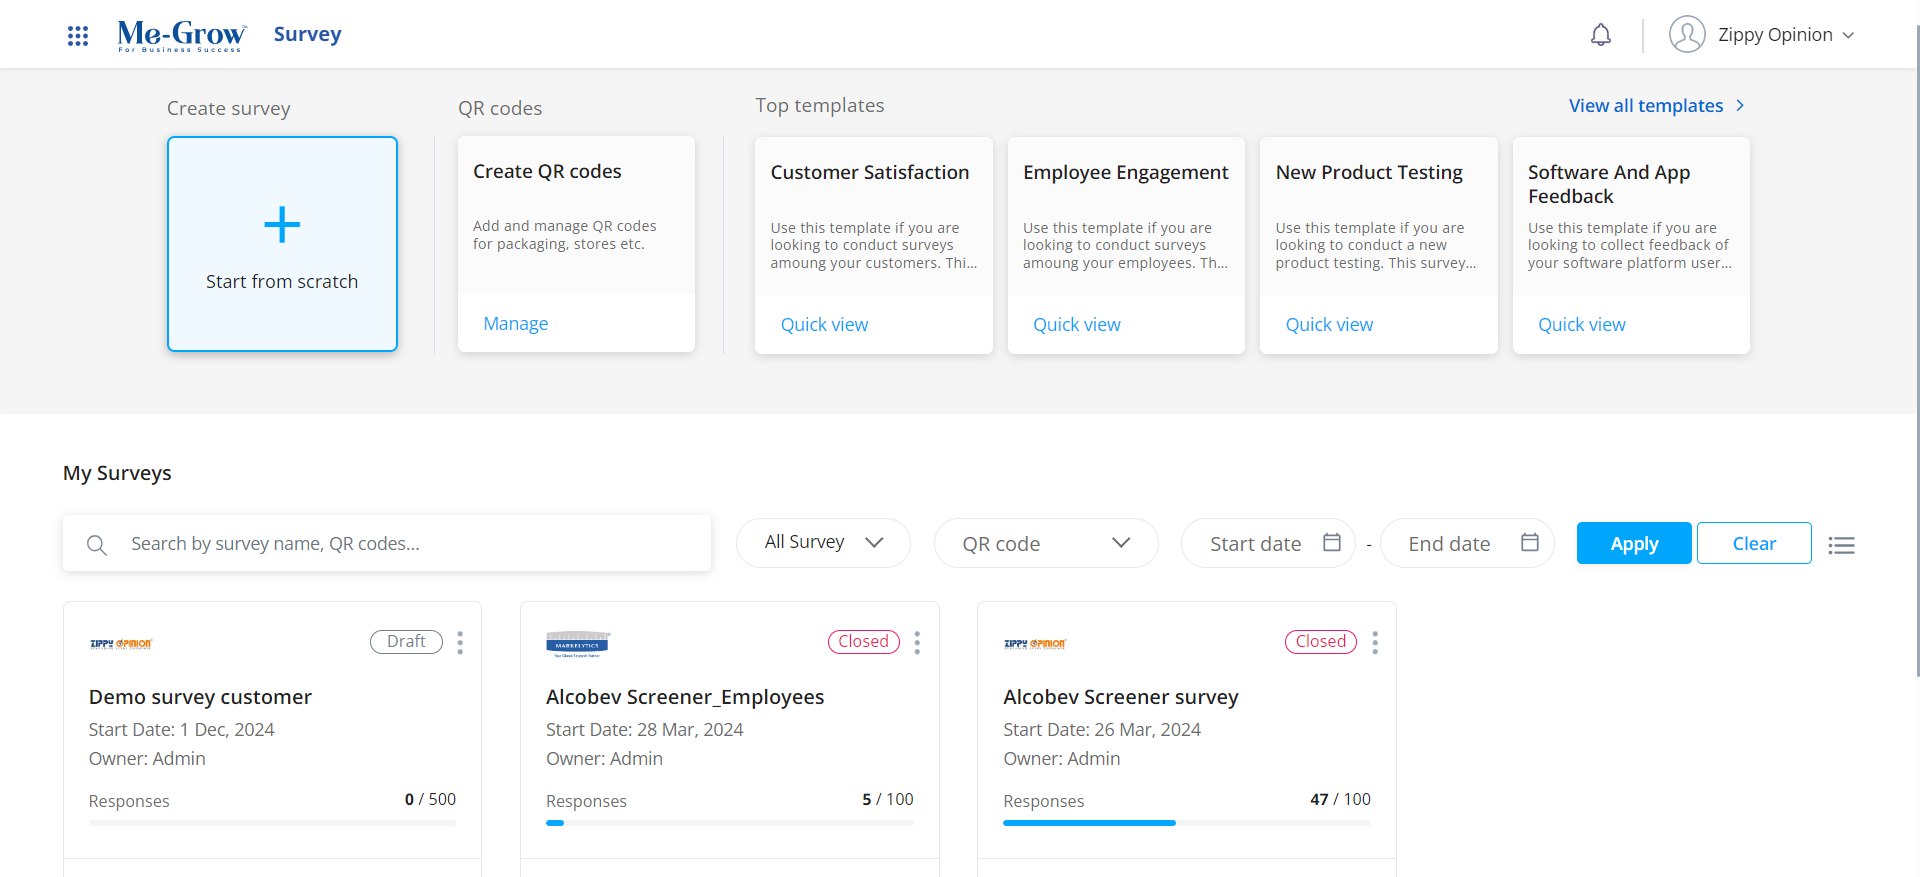
- If you want to choose any predefined survey template and create a survey, just click on “Quick view” button where you can preview the number of questions included in the template.
- To use the template, click on “Use this template” on the pop up
-
On survey list section, you can edit
 or clone
  the surveys.
Cloning or duplicating a survey – Duplicating a survey creates a duplicate version of a survey in your account. This way you don’t have to start from scratch or make edits to past surveys you’ve already launched and collected the response.
-
Click on the copy icon
 in the survey card
- Give the new survey name for duplicate version of the survey
- Once you click on “Duplicate” a duplicate version of the survey will be created and kept in a draft state
- Themes, logic and other survey design settings will carry over to the duplicate version of the survey
- You can edit and preview the copied survey
-
You can go to analyze page for the survey by clicking
 this icon
-
Can download
 the data file for any active survey in a code or label format
- You can filter the surveys based on filters like active, paused, draft, closed and submitted survey or by user type
-
You can view the survey in a list
 or a grid
  view
view
-
You can also access below survey settings from the hamburger menu
- Activate survey - When the survey is in paused or in draft status, you can activate the survey using this option.
- Pause survey - You can pause the survey which is in active status.
- Manage quota - You can manage all your quota and settings from this page.
- Close survey - You can only close the survey when the survey status is in paused status.
- Delete Survey - You can delete any survey using this option. Note that only the surveys which are in draft and closed status can be deleted.
Reports
It is a document with the activity information displayed and downloaded in an excel file. There are four report which can be downloaded in AH:
- Panel Information report (PIR): PIR consist of member’s information registered within selected date range and their status.
- Respondent report: It consist of all the respondents’ information along with response status in a project.
- Project Report: List of entire projects along with their status launch in selected date range can be downloaded under this section.
- Panel Export Report: Entire information collected from an active member within a panel can be downloaded under this section.
Project Feasibility
Researchers can quickly run a feasibility check and understand the panel potential basis the requirement (RFQ). Feasibility section required minimal information –overview, Profiler and region to calculate the panel potential. Feasibility is calculated based on total samples available, estimated incident rate (IR%) and response rate (RR%) of the panel
- To check the feasibility From Main Menu -> Project -> Feasibility

- Overview: Basic qualification and demographics to be defined in this section
- Research Industry: Select the industry segment you wish to check the feasibility for – General Consumers or Healthcare.
- Country: Select the country under which you wanted to run the project.
- Research Category: Choose the study category to get the precise feasibility.
- LOI: Estimated length of the interview. Please be precise as much as possible here as the project cost (CPI) would escalate if LOI fluctuates beyond 20%.
- Estimated IR: Estimated incidence rate. Please be precise as much as possible. Cost would escalate in IR increases by 20%.
- Age Range: Select the age range of the audience you wish to invite for the study. You can select between 18 and 99.
- Gender: Male Female or Both you would intend to invite.
- Region: Select the region you would like to check the feasibility for.
- Profile: Further filter the selection by selecting the AH global profiler and fine tune the requirement.

External Supplier Management
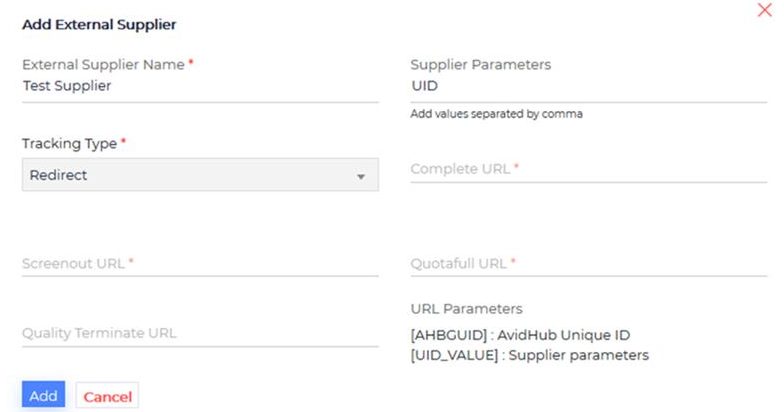
AH has the capability to host multiple external suppliers with performance measurement metric. External suppliers feature will come handy when a brand want to open a study with a new partner panel based of the project request.
- To add a new supplier, From Main Menu -> Project -> External Supplier -> Add External Supplier
- Add supplier parameters to capture additional parameters being appended from the supplier end, capture the identifier in the survey url and pass it back through the redirects.
- Supplier URL: https://member.avidestal.com/survey/supplier_survey/nGn?RID=[RID_VALUE]
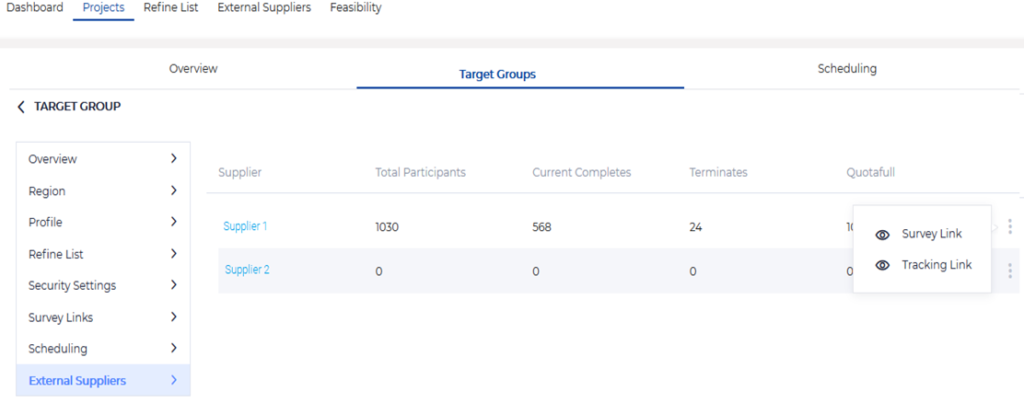
- Supplier specific entry URL will be generated once the supplier is connected to the project.
Refine List
Section were the project Manager can include or exclude specific set of members into the study. Refine list is having multiple refine options, the PM filter the members based on email, panelist ID, first name, middle name, last name, postal code and also add OR, IF, AND condition to the list.
Refined list can be utilized in two ways:
- Include/exclude from the list: Under this you have an option to design universal refine list and call the list under project. EX: consider a scenario where you want to invite only selected 50 members using panelist ID for a study or you wanted to re-contact a specific set of members for a study. Under such scenario you can design a universal refine list under refine list section and call the same under a project.
- Include/exclude from the project: You can also include/exclude respondents of the previously launched projects for present project. EX: Consider a scenario where client want to run a tracker study (monthly recurring study) and wants to exclude completes of previous 3 months study to ensure fresh and unique samples. In such scenario a brand can use “Include/exclude from the project” feature.
- To create a new refine list, From Main Menu -> Project -> Refine List -> Create Refine List
Projects
Project Management
Create and manage projects more efficiently with access to triple opted in Panel pool, supplier and quota management functionalities.
Projects section is a wizard in AH to design, manage and analyse multiple study simultaneously, it is a section where a brand can reach out to right set of audience for the right set of studies.
- List Projects: List and monitor the projects created. From Main Menu -> Project -> Projects
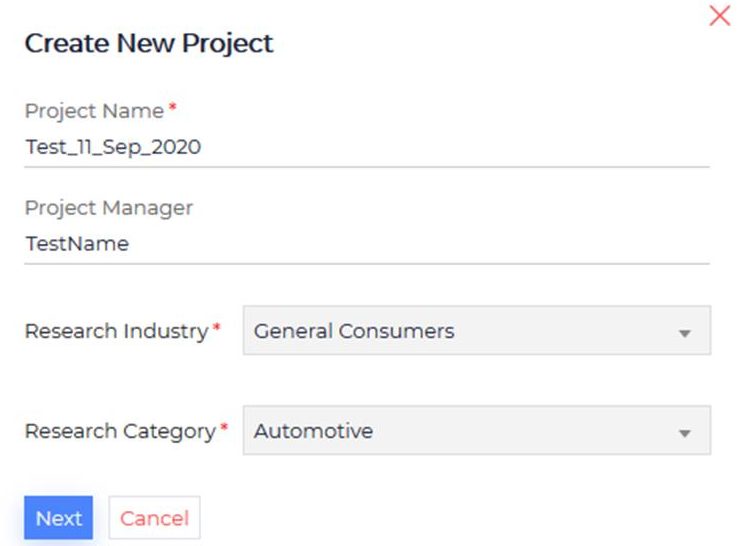
- Create New Project: To create a new project, From Main Menu -> Project -> Projects -> Create Project
- Project Name: Assign a unique name to your project to track and monitor.
- Project Manager: Name of the project manager who handles the project for future reference.
- Research Industry: Select the industry segment – General Consumers or Healthcare
- Research Category: Study category to filter our correct set of audience for your project.
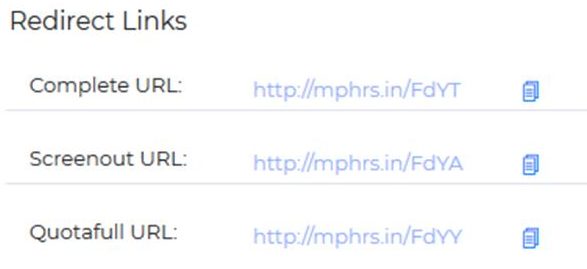
- Upon submitting the page, system will prompt the project redirects that are to be fixed in the survey. These redirects can be accessed anytime under the project settings.
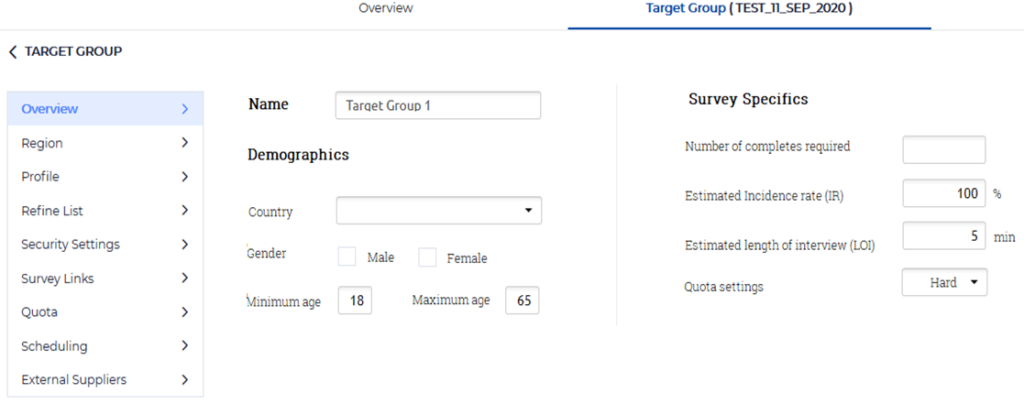
- Once the project is created, user will be routed to the Target Group section where the study qualifications are to be defined. Project can hold multiple Target groups. For multi country project, user can create one TG per country and manage multiple TGs in one single project.
Overview: Basic qualification and demographics to be defined in this section
- TG Name: A unique name to identify or differentiate the target group.
- Country: Select the country under which you wanted to run the project.
- LOI: Estimated length of the interview. Please be precise as much as possible here as the project cost (CPI) would escalate if LOI fluctuates beyond 20%.
- Incidence Rate: Estimated incidence rate. Please be precise as much as possible. Cost would escalate in IR increases by 20%.
- Required Completes: Total completes required under this target group.
- Age Range: Select the age range of the audience you wish to invite for the study. You can select between 18 and 99.
- Gender: Male Female or Both you would intend to invite.
- Quota Setup: Set as Hard or Soft Quota. Hard quota will automatically close upon reaching the required completes. While soft quotas will allow more completes beyond the limit and has to be managed manually.
- Region: Define the regional criteria, filter the audience basis Zone, State, City, County, Province and Postal code.
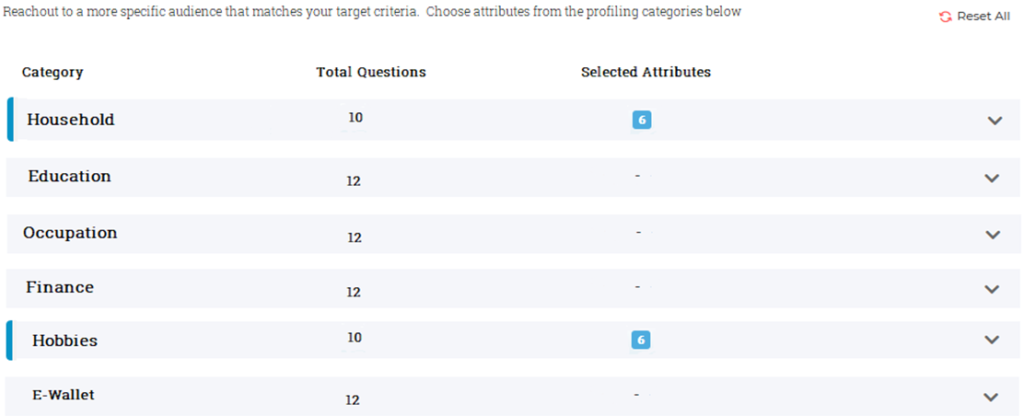
- Profile: Further filter the audience by selecting the AH global profiler and fine tune the requirement. Only panelist who fits the qualification will be invited.
- Refine list: Include or exclude specific set of panelist or respondents from previous waves basis their response status.
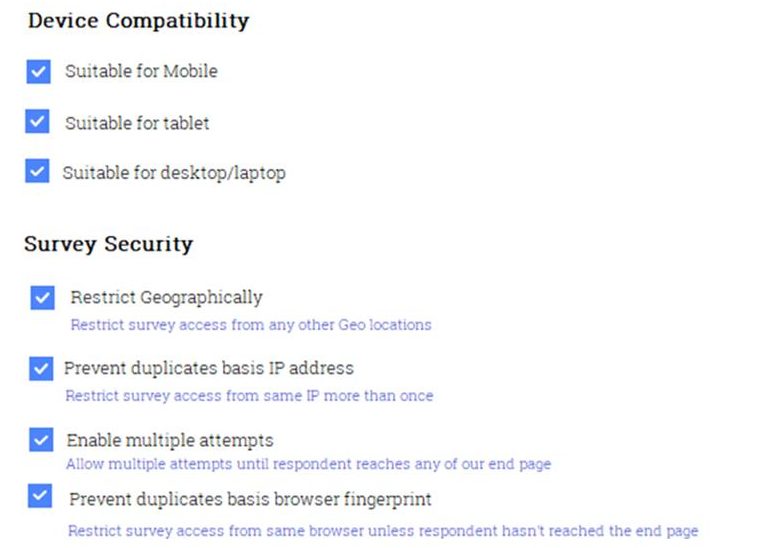
- Security Settings: Additional security to filter out the suspicious entries.
- Survey Links: Generate or Upload survey URLs.
- Add the mandatory tag [ID] to the survey URL. This tag will append the unique respondent id and will be the identifier to trace the respondents.
- To import the URLs, make use of the CSV template available.
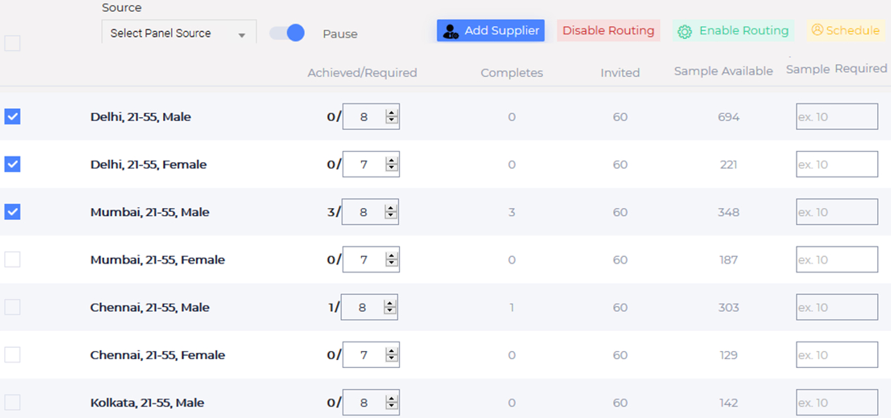
- Quota: Create interlocking quotas on the demographics, region and profile attributes chosen and define the requirement per quota slab.
- Select Source: Source from which you would like to invite panelist or allocate quotas. Could be own panels, AH panels or external suppliers.
- Activate/Pause Quotas: Select the quotas you would like to enable or disable and hit the toggle button to change the quota status.
- Add Supplier: Select the quotas you would like to allocate to the suppliers and hit this button to add new supplier and fetch one from the list already available.
- Allocate the completes required per quota from the selected supplier
- Add Supplier specific redirects
- Save
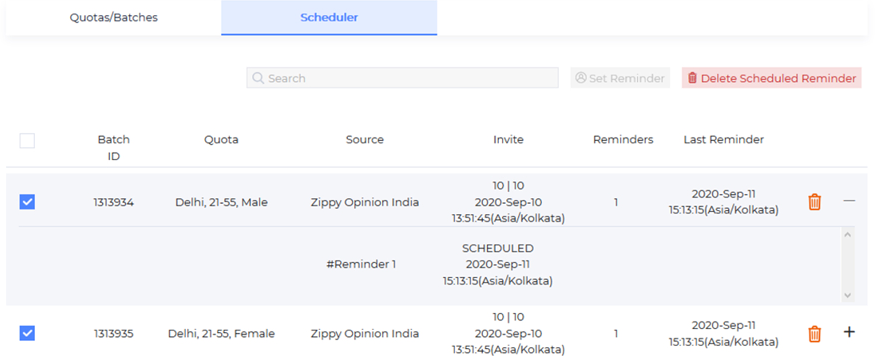
- Schedule: Select the quotas and set the number of samples required and hit Schedule button. You can schedule the invites/Reminders for a future date as well.
- Scheduler: Add samples or send reminders to any specific quota as and when required.
- Reminders: Select the Quotas for which you would like to send reminders.
- Reminder Limit: You can send up to two survey reminders per Quota.
- Schedule Reminder: Reminders can be scheduled for a future date.
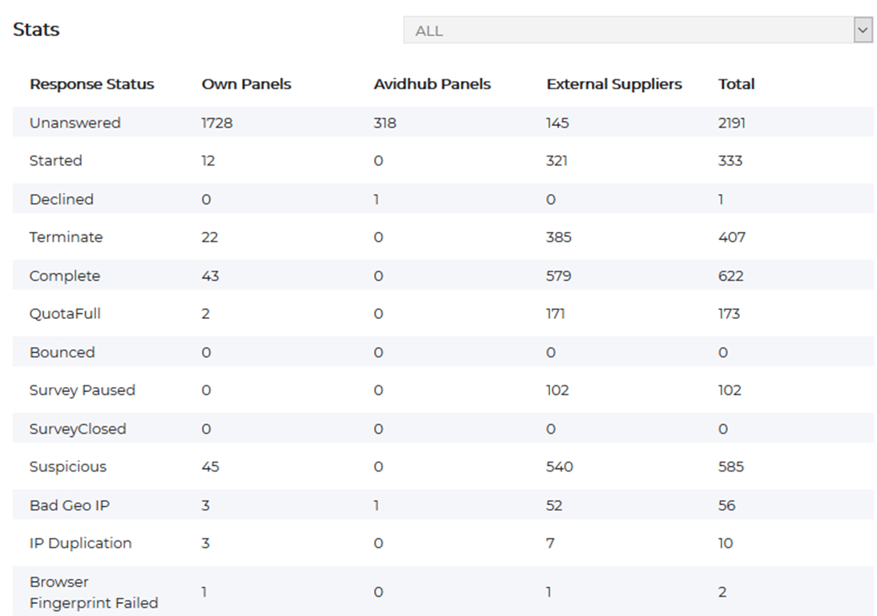
- Project Overview/Stats: Project responses (Terms, Completes, Quota Fulls and other statuses across all the supply source shall be tracked under the project Stats (Overview Section).
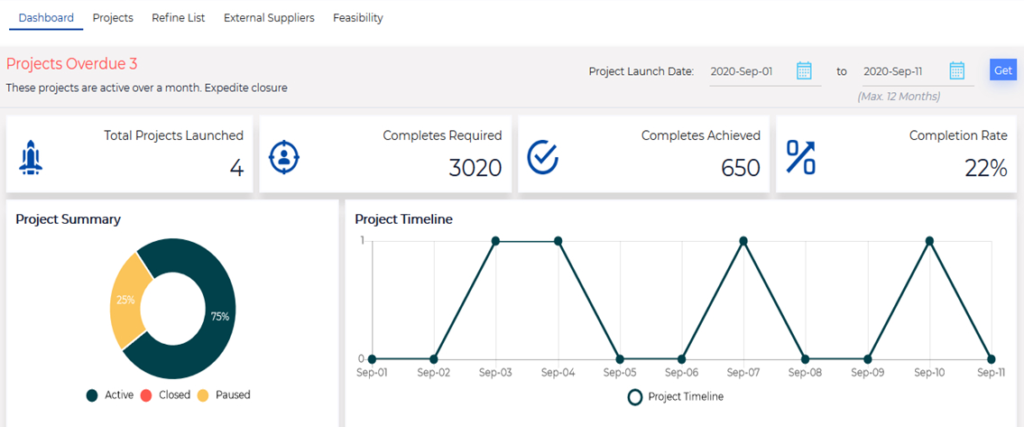
Project Dashboard: AH project management dashboard is a data-driven platform that displays metrics, stats, and insights that are specific to a projects launched or strategy by presenting a tailored mix of KPIs in one central location in order to benefit the project’s performance. It is a snapshot of all the projects launched in a stipulated time period.
- Project Overdue: Number of projects that are not closed for more than 45 days. Panelist rewards shall be approved upon project closure and it is vital to close all the projects on time. An ideal duration for any data collection project should be less than 30 days.
- Project Summary: Accumulation of projects created basis their current status.
- Timeline Graphs: Graphical representation of project, Completes and Cost timelines.
- Projects that requires attention: Under this section projects with deviations in terms of LOI, IR, Termination rate, Quotafull rate and Conversion rate will be highlighted enabling the user to attend these projects and take necessary action.

