Panel Support
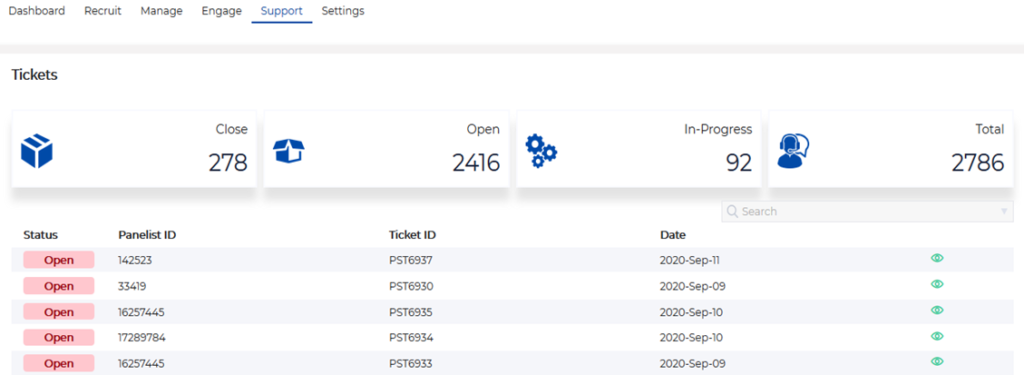
Accumulate panelist queries and feedback under the panel tool and address the concerns at ease. Tickets raised by the panelist from their portal will be accumulated and listed under the support section. Read and respond to the panelist queries from the tool.
Select Panel from the Main Menu -> Support
Panel Engagement
Engage your panelists with varieties of activities and run broadcasts and promotions to keep them updated on survey opportunities and Brand updates. Tag reward points for each and every activity and convert your active customer to a loyal customer.
- Activities: Run promotional and Engagement activities with precise set of audience. Segment and invite the audience basis various attributes and run custom activities.
- Promotional: Generic broadcast on offers and updates to the panelists. Filter the panelist by their status, date of registration and other attributes.
- Panel Logon: Import pre recruited panelists and invite them to activate their account.
- Profile Update: Invite panelist who have not updated their profile (select the profile category and system will automatically pull the incomplete profiles) to update their profile.
- App Promotion: Promote our CO-Branded App and encourage panelists to access the panel portal on the fly through our Android and IOS applications.
- Account Activation: Encourage non-activated profiles (registered but not verified the email ID) to activate their account and start participating in the survey opportunities.
- Communication Channels: Panelist can be engaged through their preferred channel (Email, SMS, APP and Desktop Notifications)
- Templates: Create custom Email, SMS or Notification templates specific to the activity and measure the campaign performance.
- Select Panel from the Main Menu -> Engage -> Templates -> Add New Template
- Activity: Select the activity for which you would like to create the template.
- Medium: Select the communication medium
- Email Subject: Add appropriate email subject
- Content: Add the customised content describing the activity. Make use of available key words to append the panel attributes dynamically.
- Create New Activity: Create activities with predefined templates and invite qualified panelists. Measure the activity conversions across all the channels.
- Select Panel from the Main Menu -> Engage -> Activities & Promotions -> Add Activity
- Select Panel from the Main Menu -> Engage -> Activities & Promotions -> under activity list hit the pie chart icon for activity statistics.
- Activity Bonus: Predefine the bonus point specific to the activities. Panelist account will be credited with the activity bonus if they complete the activities successfully.
Panel Management
Manage the panel by analysing the panelist history, loyalty index and profile pointers.
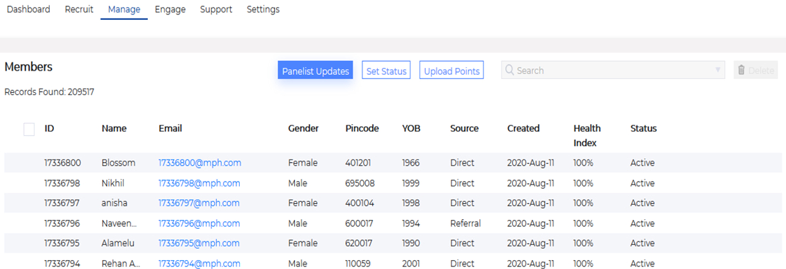
List Panel Members (Panelists): List panel members and filter basis various parameters like (Panelist ID, First Name, Last Name, Mobile Number, Email, Postal Code, Registration source, Panelist status, Gender and registration date. To access members list, Select Panel from Main menu -> Manage -> Members
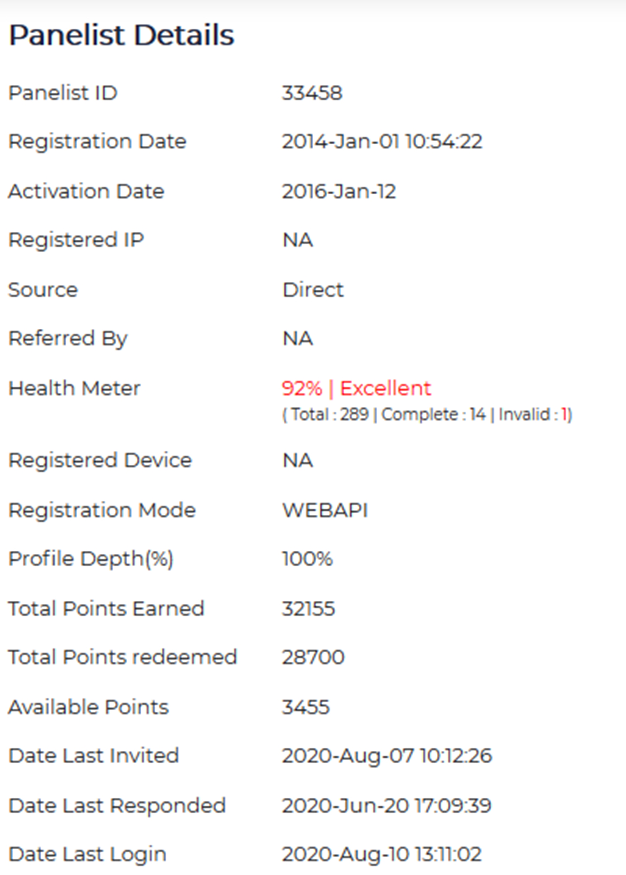
Panelist History: Access the panelist history to understand the response trend and preference. Under the panelist list, click on the panelist email ID to access the panelist specific details ranging from demographics, detailed profile, Surveys allocated, Points history, till referrals made.
- Overview: Track the basic demographics, panelist consent, and registration details.
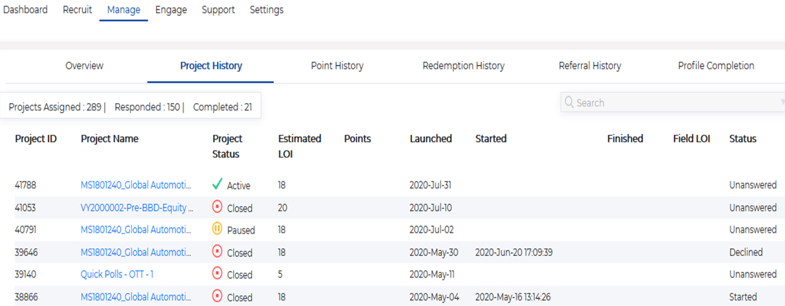
- Project History: List of research studies assigned to the panelist along with project and reward status.
- Points/Rewards History: List of rewards earned for successfully completing the activities/research projects
- Redemption History: Redemptions made by the panelist and respective status of the claim requests.
- Referral History: Track the successful referrals made by the panelist.
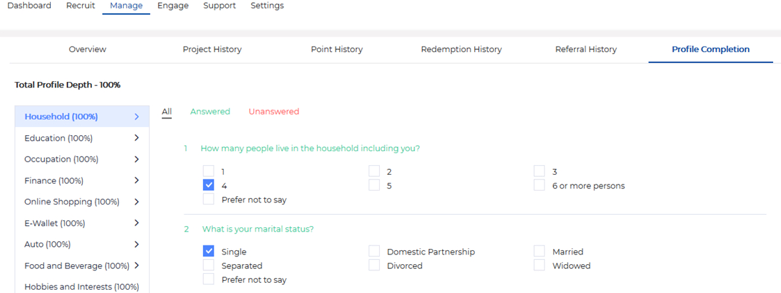
- Profile Completion: Check the list of profile questions answered by the panelist
Project History:
Point History:
Redemption History:
Referral History:
Profile Completion:
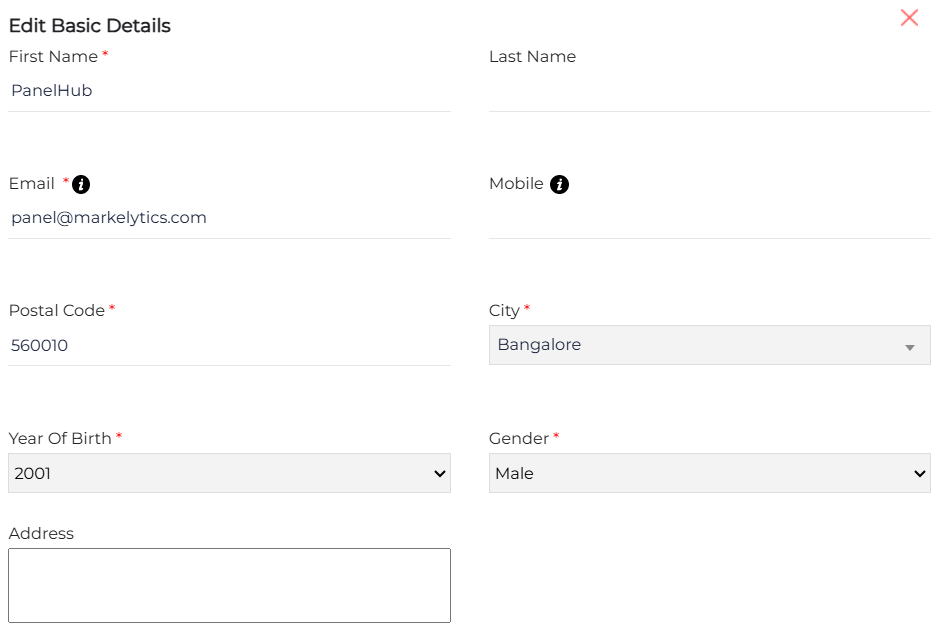
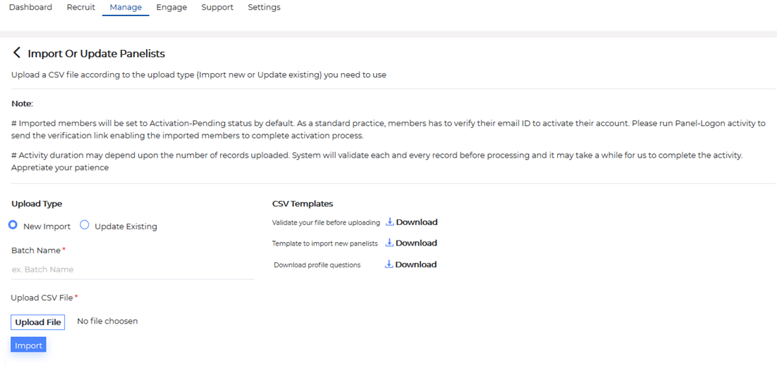
Panelist Updates: Import and update member details in bulk. Profile and demographic details can be updated in bulk using the Me-Grow PanelHub Import functionality. To access this functionality, select the panel from Main Menu -> Manage -> Members -> Panelist Update (Button) -> Import/Update Panelist (Button)
- List Batches: List all the imported batches for future reference.
- Import Panelist: Import members/panelist records. Me-Grow PanelHub shall validate the records (Email ID, Year of birth, Mobile number et al.). Import file has to be formatted as per Me-Grow PanelHub standards. All the mandatory fields are to be filled. Download the sample import template for reference.
- Select the panel from Main Menu -> Manage -> Members -> Panelist Update (Button) -> Import/Update Panelist (Button) -> Download template to import new panelist.
- To include the profile details in the import file, add additional columns at the end of import template. Add profile question ID as header and fill in the column with answer option IDs. Refer the profile question and answer option IDs under - Select the panel from Main Menu -> Manage -> Members -> Panelist Update (Button) -> Import/Update Panelist (Button) -> Download profile questions.
- Update Existing Panelist: Update the profile details for the existing panelists
- Select the panel from Main Menu -> Manage -> Members -> Panelist Update (Button) -> Import/Update Panelist (Button) -> Select “Update Existing” option under upload type -> Download template to update existing panelists.
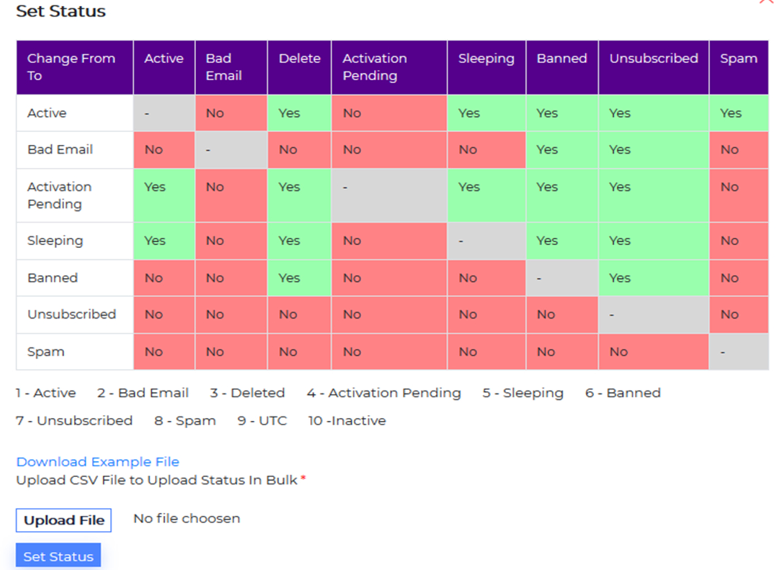
- Panelist Statuses: Panelists/Members are segmented on various status basis various attributes like, responsiveness, email validity, reachability etc. Listed below the available panelist statuses.
- Active: Panelist successfully verified their email ID and are actively participating in research studies
- Activation Pending: Panelist who registered but not verified their email/Account not activated yet
- Sleeping: Panelist who activated but gradually stopped responding to research studies.
- Deleted: Panelist who has been deleted manually. Admin can delete the test IDs.
- Banned: Panelist who has been set as banned basis the suspicious activities witnessed.
- Spam: Panelist who had marked our emails as SPAM.
- UTC: Unable to Contact – Panelist whose emails are getting bounced and no other medium available to contact (Panelist has not shared Phone number or installed the app so we can reach out through SMS or app notifications).
- On Vacation: Panelists who are on vacation, Panelist can opt out of promotions or survey invites for a period of 15 days
- Unsubscribed: Panelist who had unsubscribed/Unregistered from the panel/Community.
- Set Panelist Statuses: Update panelist status to segment them. Select the panel from Main Menu -> Manage -> Members -> Set Status (Button)
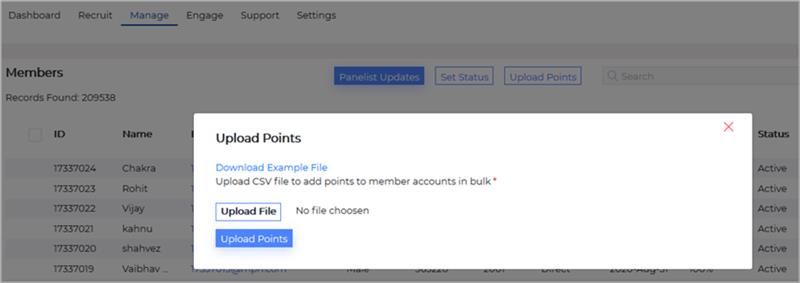
- Panelist Rewards & Bulk Point update: Upload panelist/Member reward points in bulk. Select the panel from Main Menu -> Manage -> Members -> Upload Points (Button)
Create a CSV file with the list of panelist, points to be assigned and reason for the point credit/debit.
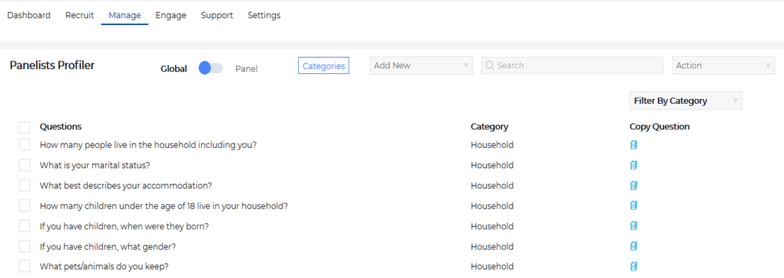
- Profile Questions: The questions section allows you to administer the profiling questions and categories that you have on your panel. The panel will be set up with the standard profiling categories and questions and once set up you can access them through the questions tab. Select the panel from Main Menu -> Manage -> Profile Questions
- Global Questions are used for sampling. Panel questions are connected to global questions so that it's easier to do feasibility check and sampling across multiple panels hosted in Me-Grow PanelHub. Every question has its variables/answers and settings.
- Panel Questions are panel specific and can be connected to global questions; every question has its variables/answers and settings.
- Profile Question Category: This function allows you to create a new category for additional profiling questions that you wish to add to your panel. For example if you have panel specific questions that you wish to add to the panel (such as “How often do you visit our website?”, “How often do you read our newspaper”?) you can create a separate category to place these under. A category is the header under which all of the profiling questions reside. For example the category Auto will contain all of the questions related to the consumer automobile.
- Add New Category : To create a new profile category, Select the panel from Main Menu -> Manage -> Profile Questions -> Add New -> Category
- Add New Profile Question: Add custom questions under the profile category created. To add a new question Select the panel from Main Menu -> Manage -> Profile Questions -> Add New -> Question
- Category: Choose the category which the question will be created under.
- Question Type: Choose from the drop down list if you question will be a single choice question or a multiple choice question
- Question Name: Add the name of the question.
- Question text: Place the question in the question text box in English.
- Native text: Place the translation of the question in the native language in the native text box.
List Global & Panel Questions
List Profile Question Categories
Add New Category/Profile Question
- Payment Methods: Connect the preferred reward options and allow the panelist to redeem upon reaching the minimum threshold. Set the redemption limit and customize the content to be made visible in the panelist portal. To list and add a new payment method to the panel, Select the panel from Main Menu -> Manage -> Payment Methods
- Add New Payment Method: Add new Payment options, connect or disconnect the option from the panelist portal. Select panel from Main Menu -> Manage -> Payment Methods -> Add New (Button)
- Payment Method Name: Set the option name or Reward Name.
- Min-Limit: This defines the minimum redemption threshold. Set the limit that the panelist can redeem upon reaching.
- Max-Limit: This will be the maximum redeemable limit.
- Unit Cost: Cost per reward code/Voucher code. Redemptions will be in multiples of the unit cost.
- Confirmation Message: Confirmation message that will be displayed in the panelist portal upon raising the redemption requests allowing panelist to verify their claim once.
- Acknowledgement Message: Success message/Confirmation note upon submitting the claim request.
- Logo: Attach the reward logo to be displayed in the panelist portal.
- Connect & Disconnect: Connect or disconnect the Payment option, from the list of payment methods created, hit the hamburger (three vertical dots).

- Payment Batches: A batch will be created under your account once your panelists redeems their earned points towards the reward options connected to the panel. These batches accumulates the panelist and redemption details enabling the panel owner to validate and process the payment. To access the payment batches, Select the panel from Main Menu -> Manage -> Payment Methods
- Add New Payment Method: Add new Payment options, connect or disconnect the option from the panelist portal.
- Select panel from Main Menu -> Manage -> Payment Batch
- Redeem Request: All the redemption claims will be accumulated as a batch under Redeem Request. Create the batch to analyse the details of each and every claim requests.
- Select panel from main Menu -> Manage -> Payment Batch -> Redeem Request -> Under the list hit the hamburger menu to access the batch.
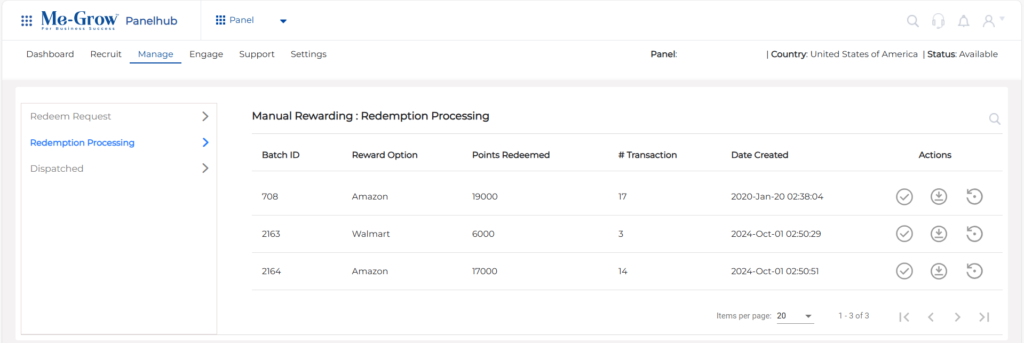
- Redemption Processing: Redemption batches created shall be moved to “Redemption Processing” Download the batch in CSV format to read the details of the panelist and redemptions made.
- Commit: Upload the appropriate reward codes using the reward dispatch template available under the “Commit” option. To access this menu,
- Select panel from the main Menu -> Manage -> Payment Batch -> Redemption Processing -> Under list hit the Hamburger menu.
- Dispatched: All the processed batched will be listed in this section for future reference.
Panel Building
A panel is a group of online verified respondents who has agreed to take part in market research studies, using Me-Grow PanelHub(AH) a brand can design a panel from the scratch, AH has various security features to ensure optimal panel quality.
Build and manage an online panel in four simple steps.
- Build: Build the customer base by running digital recruitment campaigns or connect your existing panel base.
- Manage: Manage members with advanced health algorithm. Manage churn with effective campaign management with analysis & ensure optimal results.
- Engage: Advanced engagement model with smart interaction and customer retention.
- Gratify: Gratification for every activity by member/customer and make loyal customer.
Panel Settings:
Design a panel with brand specific elements to effectively engage with the customers.
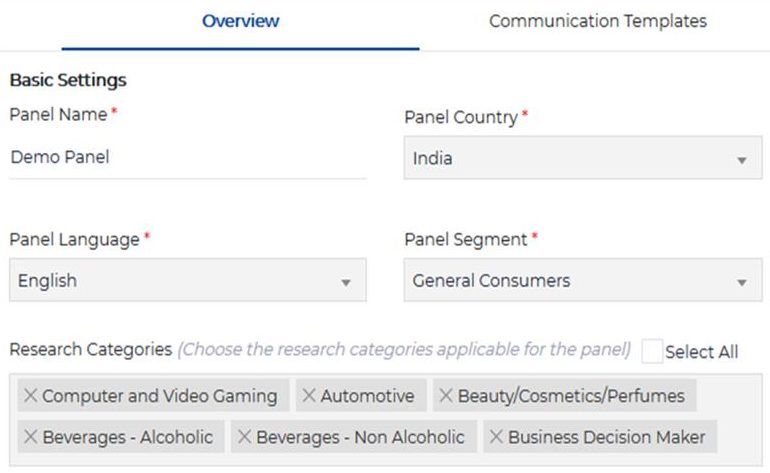
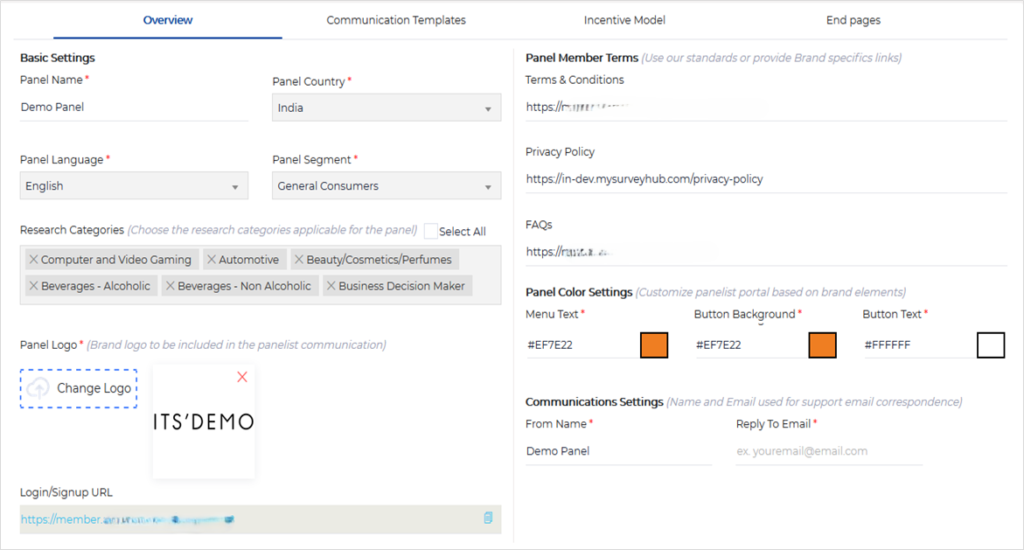
Overview/Basic Settings: This section covers the basic settings required to design a panel.
- Panel Name: Define the brand/Panel Name. An account can have multiple panels and the name should be unique.
- Panel Country: Choose the country under which the panel/Community is to be built.
- Panel Language: Choose the panel language. Primary language in which the panelist portal and communication templates will be set.
- Panel Segment: Define the panel segment (Healthcare or General Consumers)
- Research Categories: Choose the research categories applicable for the panel. Studies under the selected categories shall be run in the panel/Community. Unselected research categories are restricted.
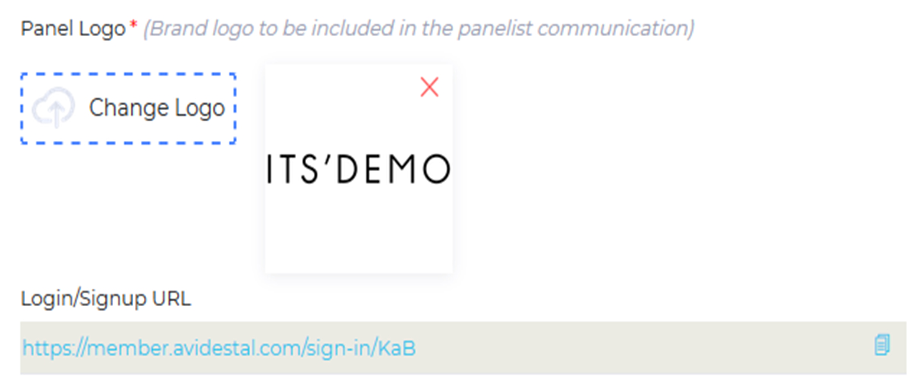
- Panel Logo: Brand/Panel logo to be included in member communique.
- Signup URL: Sign up/Sign in URL for the members to register and access their panel account. This link will be embedded in the brand website and the traffic to be routed here.
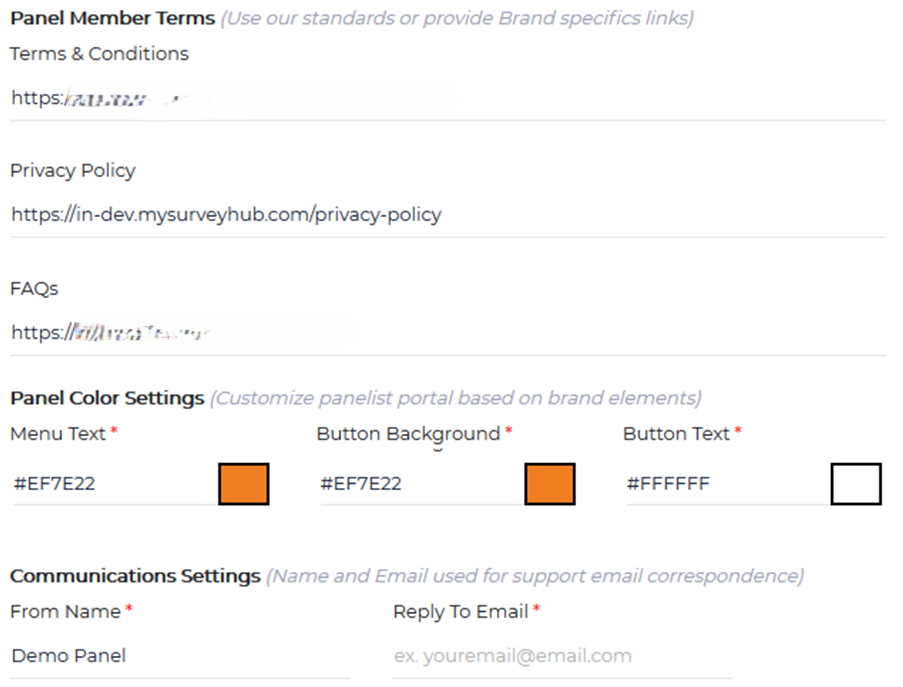
- Member Terms: Brand specific Terms and Conditions, Privacy Policy and FAQs. You can also use our standard links if you do not have one.
- Colour Settings: Brand specific color codes to customize the panelist portal in line with brand element. Customise Menu and button formats.
- Communication settings: Define the support desk email to receive member queries and set the Name with which you would like to interact with the members.
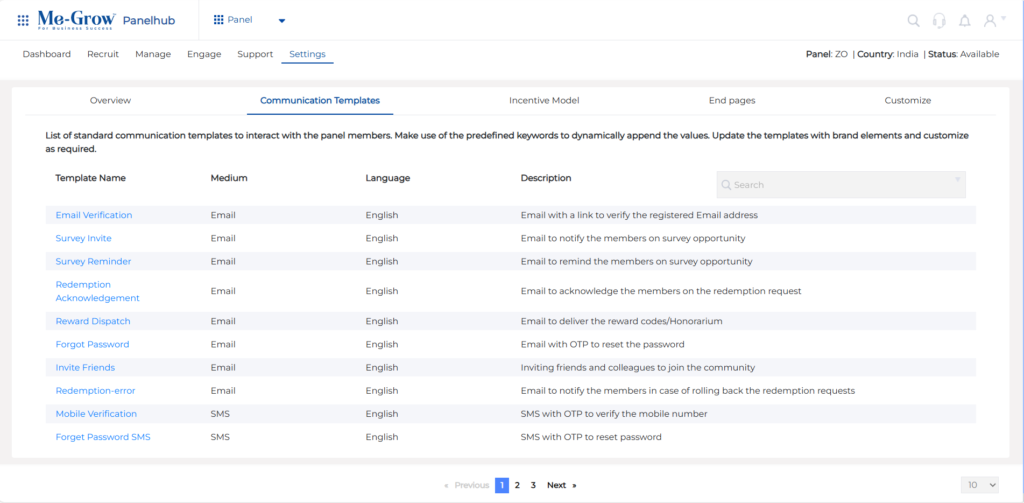
Communication Templates: Define the standard communication templates that could be fetched dynamically when launching projects and promotional activities. Make use of the predefined keywords to dynamically append the values. Update the templates with brand elements and customize as required.
- Communication Channels : Email, SMS, Desktop Notifications , FAX
- Account Activation: Activation link will be sent to panel members upon registration. To verify and validate the member’s email address.
- Survey Invitation: Email to notify the members on survey opportunity
- Survey Reminder: Email to remind the members on survey opportunity
- Redemption Acknowledgement: Email to acknowledge the members on the redemption request
- Reward Dispatch: Email to deliver the reward codes/Honorarium
- Forgot Password: Email with OTP to reset the account password
- Invite Friends: Inviting friends and colleagues to join the community
- Redemption Error: Email to notify the members in case of rolling back the redemption requests
- Mobile Number Verification: SMS with OTP to verify the mobile number
- SMS - Survey Invite: SMS invite to notify the members on survey opportunity
- SMS - Survey Reminder: SMS to remind the members on survey opportunity
- Notification - Survey Invite : Desktop notifications to members on survey opportunity
- Notification - Survey reminder: Desktop notifications to remind members on survey opportunity
- Fax - Survey Invite: Fax invite to notify the members on survey opportunity (For Private Panels)
- Fax - Survey Reminder: Fax to remind the members on survey opportunity (For Private Panels)
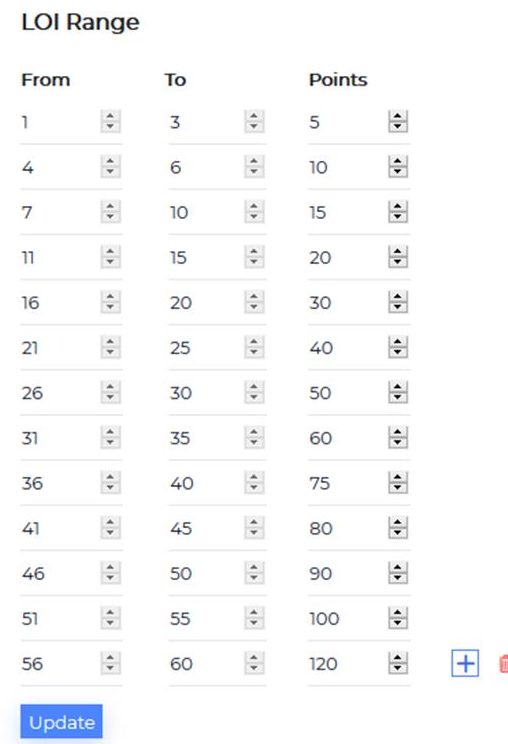
Incentive Model: Define point based incentive model based on length of the study. Members upon successfully completing the study/activity will automatically be assigned with the predefined incentives/points based on this table.
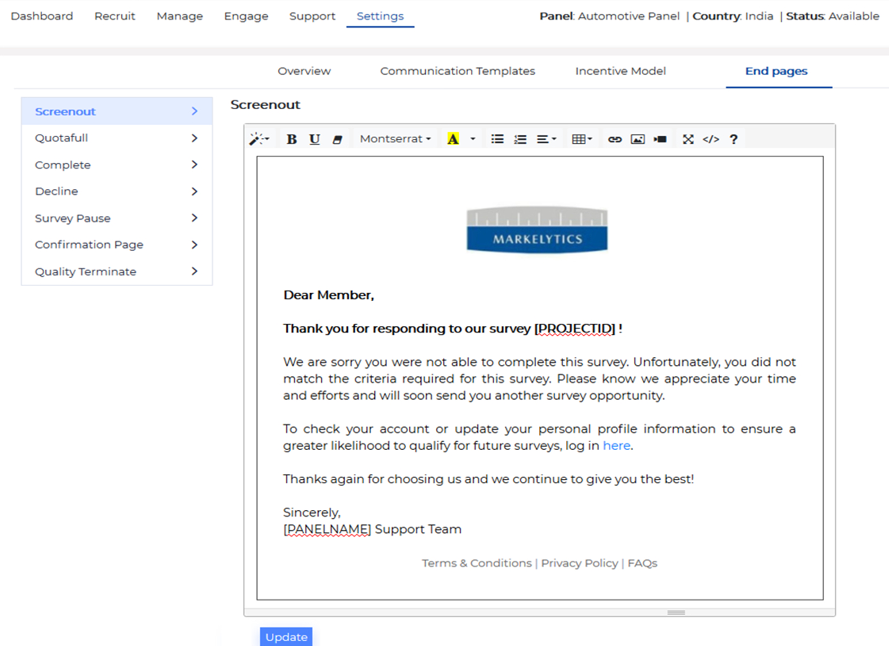
End Pages: Standard End pages. Members will be routed to these pages based on their statuses upon completing a study. HTML driven pages that can be customised as per the brand requirements.
- Confirmation Page: Welcome message for the members upon successfully verifying their email address.
- Screen out: End page when the member gets termed out of the study basis the qualification criteria.
- Quota full: End page when member attempting to answer the survey quota that is already met.
- Complete: Success massage for the member upon completing the research study
- Survey Paused: Warning message to members when attempting to answer the survey that is closed for data analysis.
- Quality Terminate: Warning message to members when trying to complete the study suspiciously.
Panel Dashboard:
A panel dashboard is an information management tool that visually tracks, analyses and displays key performance indicators, metrics & key data points to monitor the health of a panel business.
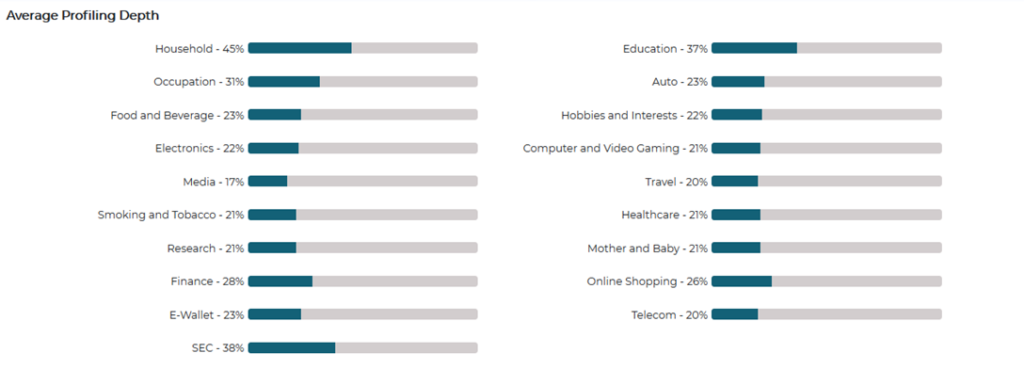
- Panel Stats: Snapshot on overall panel performance. Track active members, panel response rate, Profiling depth, panel retention rate and unsubscribe rate on a glance.
- AARRR Analysis: Funnel modelling to track and measure the churn at every stage of customer acquisition.
- App User: Tracking the Co-branded app penetration amongst the active members.
- User Journey: A snapshot on the user journey mapping to understand the customer experience.
- Panel Utilization: Member segmentation basis study invites and utilisation.
- Panel Usage: Responses and completes received against the total invites. Helps to analyse panel responsiveness.
- Response rate timeline: Monthly response rate tracker.
- Profiling Depth: Track the profiling depth per profile category and plan to engagement activities to enrich panelist data pointers.
- Panel distribution: Compare panel potential with national census representation.
Panel Recruitment:
Design, run and analyze digital recruitment campaigns and measure the affiliate & Campaign performance over the time. With Me-Grow PanelHub, connect multiple affiliates for panel recruitment and track the conversions.
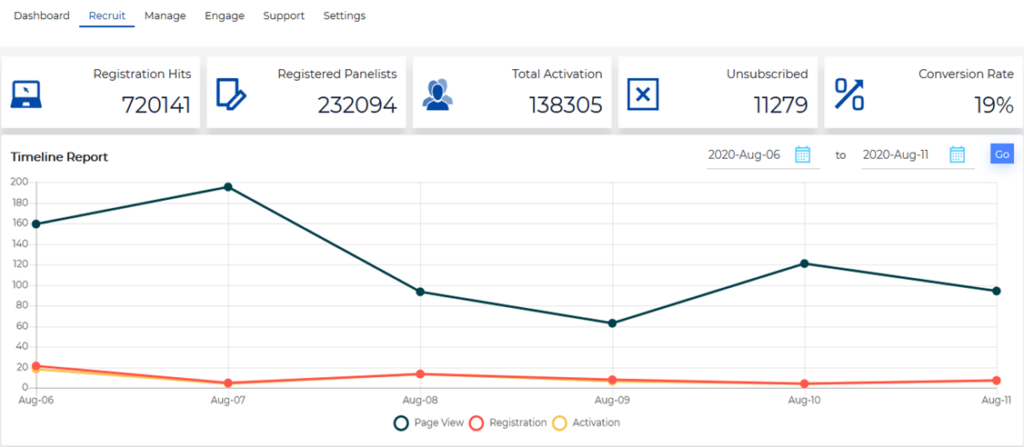
- Tracking: Track the campaign conversions at each stage - Page views, Registrations and Activation. Analyse the conversion, retention rate per affiliate/traffic source.
- Timeline Report: Day wise conversion analysis on the campaigns.
- Overview by Source: Traffic source/Affiliate specific conversions, utilization, retention and responsiveness metrics.
- Distribution by Source: Traffic source/Affiliate specific panel distribution on Gender, Age group and Region.
- Add Affiliate: To set up a new affiliate, from panel menu – Choose the panel -> Recruit -> Affiliate -> add affiliate
- Affiliate Name: Provide the name of the affiliate you wish to add.
- Tracking Type: Select the tracking type. This will be basis the affiliate preference. (Pixel, Redirects, Postbank-Post, Postback-Get)
- Affiliate Identifiers: Add Identifiers if any to be passed back to the affiliates through the pixel codes. These identifiers will be passed in the recruitment page URL at affiliates end and they would expect us to pass it back through the tracking codes.
- Pixel Code/URL: Add the tracking code provided by the affiliate. Replace the identifiers with Ah specific keywords to append the identifiers in the tracking code.
Example: In the code shown below Unique Panelist ID has been appended
<img src=”https://affiliate.go2cloud.org/aff_l?offer_id=176&adv_sub=[PANELISTID]” width=”1″ height=”1″ />
- Keywords: Parameters that could be passed/appended in the tracking code.
In the screenshot above, identifiers UID and Transaction ID has been appended to the post back link.
Campaign Management: Add and manage campaigns under the affiliates created. Track the conversions and measure the performance.
- List Campaigns: List campaigns initiated and monitor the conversions across multiple campaigns created under various affiliates.
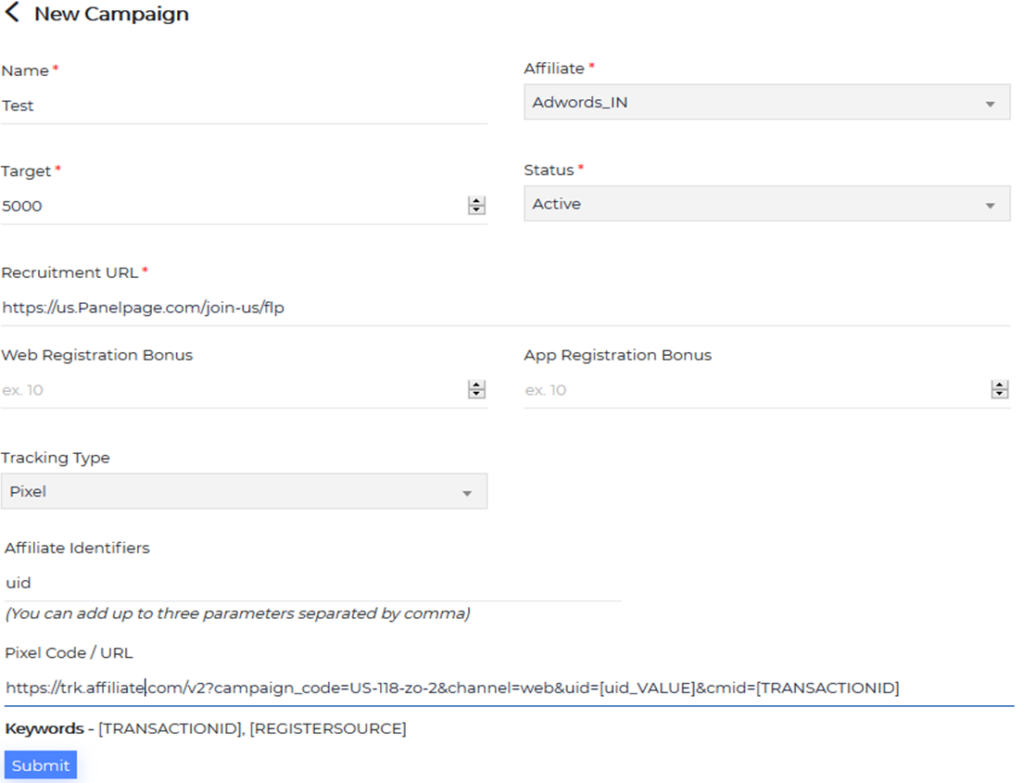
- Add Campaign: Set up a new campaign, from panel menu – Choose the panel -> Recruit -> Campaign -> Add Campaign.
- Campaign Name: Add a campaign Name. Name should be unique
- Affiliate: Select the affiliate under which the campaign is to be set.
- Target: Define the target – Required activations. Campaign will automatically pause upon reaching the target.
- Status: Set the campaign Status (Draft, Active, Paused, Closed). Manually activate and pause campaigns.
- Recruitment URL: Landing page URL where you wish to drive the affiliate traffic and get them registered in your panel. Landing page should have the panel specific signup/Sign in URL iframed to capture the registrations and track the conversions.
- Registration Bonus: Reward bonus if any to be allocated to the members upon successful activation. (Optional)
- Tracking Type: Tracking type as preferred by the affiliate. This will automatically fetched upon selecting the affiliate. If required, tracking type can be changed specific to this campaign.
- Affiliate Identifiers: Identifiers/Parameters defiled under the affiliate to identify the traffic. These parameters shall automatically be fetched as defined under the affiliate chosen. Fetched from the affiliate settings. Can be changed specific to the campaign if required,
- Pixel Code: Pixel codes defined by the affiliate. Fetched from the affiliate settings. Can be changed specific to the campaign if required,
- Keywords: Identifiers and Parameters available
- Campaign Stats: Track the conversions for each and every campaigns and visualise data at a glance to understand the campaign performance. To track the stats, Panel -> Recruit -> Campaign -> Under campaign listing click on the pie chart icon specific to the campaign.
- Campaign URL: Recruitment URL are generated specific to the campaign. All the registrations happening through this link would be tracked under the campaign. You will have to share this link to the affiliate to route their traffic and you can manage the conversions. To grab the campaign specific URL, Choose panel -> Recruit -> Campaign -> Hit the hamburger menu specific to the campaign
Me-Grow PanelHub
One Stop Digital Intelligence Hub for Market Research.
A DIY technology platform that leverages AI, Analytics, big data and automation to streamline your customer experience and help you win, retain and delight customers.
This section will help you become familiar with our Panel/Project Management System as you set up your first panel, or as a reference for those of you who have panels already in our system. We are constantly updating and upgrading our system so this guide will have something to offer for everyone.
Manage Users
Manage Users tab will help to manage all the Community owner and client accounts added under Admin account.
- Can see list of community owners, clients and the communities assigned to them.
- You can add new CO or client by clicking on “Add new” option given at the top.
- Can filter the list by communities and date added.
- Can “edit” the CO or client accounts with options like “Deactivate”, delete or could change name or transfer ownership of the community.
What are Tickets in Me-Grow Community?
Tickets feature will help you to manage all the queries/tickets raised by the community members and approval for pending posts from the contributors. Through tickets one can:
- See the list of all the tickets raised
- Sort the tickets by status/Community/type/date
- Answer the tickets via text/media/files
- Update ticket status
- See member profile
Activities List
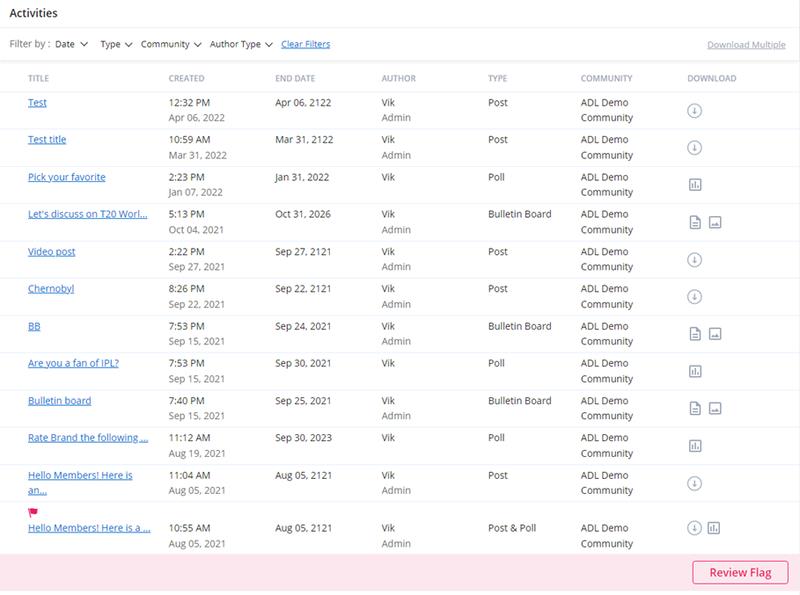
Activities helps you to track all the posted activities in the community. It shows the list of activities with filters basis type and action items for download or view an activity.
- It shows the list of activities created such as Post, Bulletin Board, Polls.
- To view any post, bulletin board or poll one can click on title to view the post, bulletin board or poll.
-
You can download post transcripts by clicking on “download” icon
 given under download column.
-
You can download poll result by clicking on “poll” icon
 given under download column.
-
You can download bulletin board transcripts and media files by clicking on “file” and media icon
 given under download column.
- You can download multiple post transcripts together by applying filter – Type> Post, Community> Select and click on “Download” button which is shown on the list header.
- You can download multiple poll results together by applying filter - Type> Poll, Community> Select and click on “Download multiple” button.
-
If there are any flagged post or comment one can see those are highlighted
 for a particular post and on click of “review flag” you can view the details of the flagged post or comment.
What are the types of activity I can create in Me-Grow Community?
You can create 5 types of activity in Me-Grow Community, namely, Post, Bulletin board, survey, Answer grid and Polls. To create activity, go to your community and click “Create” button, you will be able to create any of the activity of your choosing.
- You can attach any media or files along with the activity, you can give title and description describing the activity.
- You can set permission and points basis on your activity need such comment/reaction permissions and points for each sub activities.
- Can set an end date for activity to complete before creating.
How to create post?
- To create post, click on “Create” button.
- Select “Create post” from the dropdown.
- Add title and description of the post.
- Attach media or files or polls if required.
- Set the points & permission from right side panel given.
- Click “post” button to create the post for the community.
How to create bulletin board?
- To create bulletin board, click on “Create” button.
- Select “Create bulletin board” from the dropdown.
- Add title and description for the bulletin board.
- Set the permissions and points from right side panel given.
- Click on “Create” to create bulletin board for the community.
How to post surveys in community?
- To post a survey, click on “Create” button.
- Select “Create & Post survey” from dropdown.
- Select a survey from the given drop-down "Survey name".
- Note that the surveys shown in the drop-down are all your ACTIVE surveys which is created in Me-Grow survey product. If you want to create new survey, click on "Create new" which will take you to survey creation module to create the survey.
- Upon selecting a survey from drop-down, you can give title and description to post the survey
- You can set start and end date for the survey post.
- Click on “Post” to post the survey in the community.
How to create polls?
- To create a poll, click on “Create” button.
- Select “Create polls” from dropdown.
- Select poll question type.
- You can create polls with 5 different types of question (Single, Multiple response, Yes/No, Rating, Image pick).
- You can set a poll limit and end date for the poll.
- Click on “Post” to create the poll for the community.

